准备工作:
如何申请家宽公网 IP? 我是联通宽带 只用给打电话给 96480 报宽带账号就给办(强调要动态公网 IP)。最近两年装的宽带 要改光猫的配置,自己去搜相关教程就行。
第一步
部署类似 ddns-go 的脚本,(我嫌麻烦,我用了 python 脚本 腾讯云动态域名解析)
首先要安装 python 库
pip install tencentcloud-sdk-python再把下面的代码新建文件到任意路径
from tencentcloud.common import credential
from tencentcloud.common.profile.client_profile import ClientProfile
from tencentcloud.common.profile.http_profile import HttpProfile
from tencentcloud.dnspod.v20210323 import dnspod_client, models
from urllib.request import urlopen  # 添加这行导入语句
import json  # 添加这行导入语句

ipv4_flag = 1  # 是否开启 IPv4 DDNS 解析,1 为开启,0 为关闭
secret_id = "腾讯云id"
secret_key = "腾讯云密钥"
domain = "xxx.xxx"  # 你的主域名
name_ipv4 = "xxx"  # IPv4 DDNS 解析的子域名

cred = credential.Credential(secret_id, secret_key)
httpProfile = HttpProfile()
httpProfile.endpoint = "dnspod.tencentcloudapi.com"

clientProfile = ClientProfile()
clientProfile.httpProfile = httpProfile
client = dnspod_client.DnspodClient(cred, "ap-guangzhou", clientProfile)

def get_records(sub_domain, record_type):
    params = {
        "Domain": domain,
        "SubDomain": sub_domain,
        "RecordType": record_type
    }
    req = models.DescribeRecordListRequest()
    req.from_json_string(json.dumps(params))
    resp = client.DescribeRecordList(req)
    return json.loads(resp.to_json_string())["RecordList"]

def update(record_id, sub_domain, record_type, value):
    params = {
        "Domain": domain,
        "RecordId": record_id,
        "SubDomain": sub_domain,
        "RecordType": record_type,
        "Value": value,
        "RecordLine": "默认"
    }
    req = models.ModifyRecordRequest()
    req.from_json_string(json.dumps(params))
    resp = client.ModifyRecord(req)
    print(resp.to_json_string())

def add(sub_domain, record_type, value):
    params = {
        "Domain": domain,
        "SubDomain": sub_domain,
        "RecordType": record_type,
        "Value": value,
        "RecordLine": "默认"
    }
    req = models.CreateRecordRequest()
    req.from_json_string(json.dumps(params))
    resp = client.CreateRecord(req)
    print(resp.to_json_string())

# IPv4 DDNS 解析
if ipv4_flag == 1:
    # 获取当前 IPv4 地址
    ip = urlopen('https://api-ipv4.ip.sb/ip').read()
    ipv4 = str(ip, encoding='utf-8')
    print("获取到IPv4地址:%s" % ipv4)

    # 获取腾讯云 DNSPod 上的所有记录
    existing_records = get_records(name_ipv4, "A")

    if not existing_records:
        add(name_ipv4, "A", ipv4)
        print("新建域名解析成功")
    else:
        if existing_records[0]["Value"].strip() != ipv4.strip():
            update(existing_records[0]["RecordId"], name_ipv4, "A", ipv4)
            print("修改域名解析成功")
        else:
            print("IPv4 地址未更改")

print("本程序版权属于naigou,博客:https://www.naigou.cn")
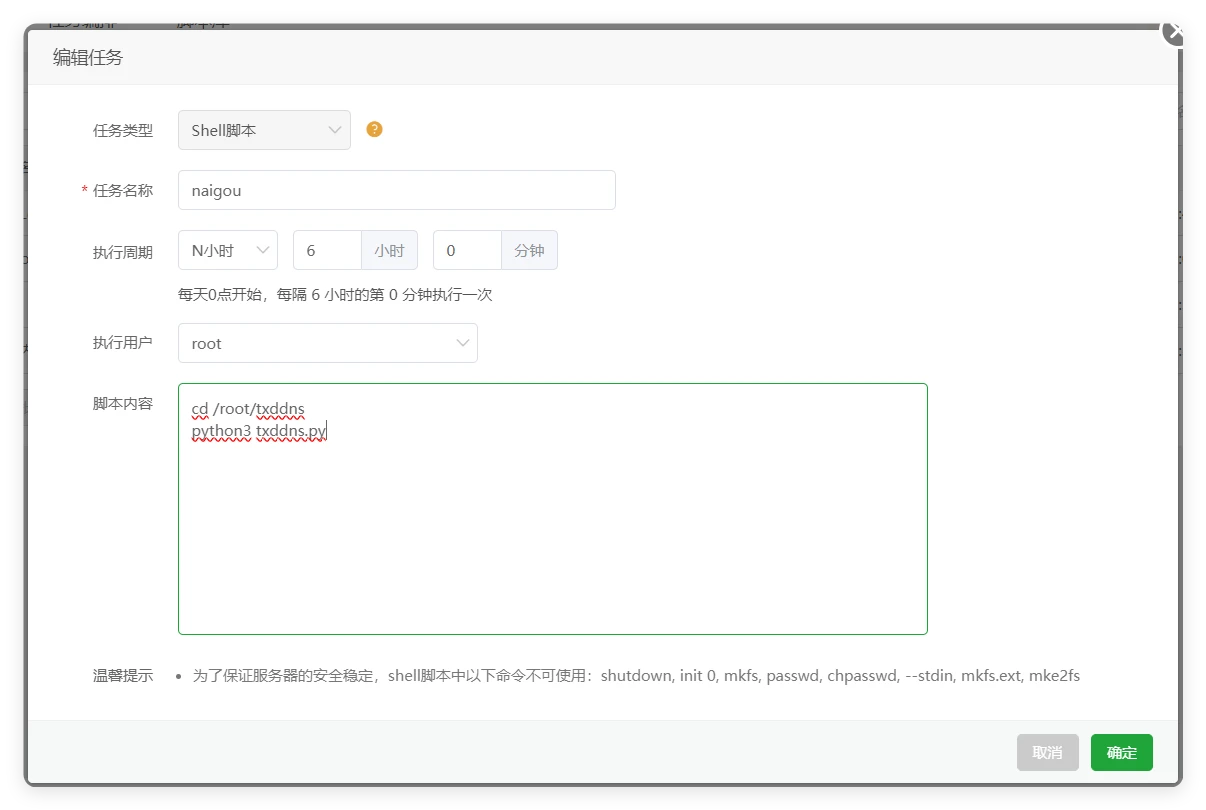
例如我把这个脚本重命名为 txddns.py 放在了 /root/txddns 目录下,那么执行命令就是
cd /root/txddns
python3 txddns.py
找到宝塔面板的计划任务 按图片对应添加 (执行周期按喜好填)

记得要打开路由器后台的端口转发 把你小主机的内网 IP 地址填进去就行。端口全开放(对外的 80 443 运营商屏蔽,下面的教程就教你怎么绕开)
第二步
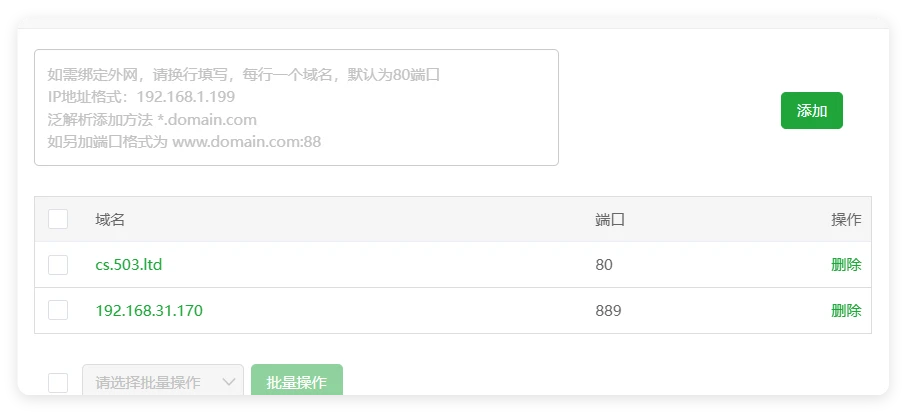
建站,没啥好讲解的,就跟普通服务器一样,但是 要在域名中加上个 ip + 端口 例如我的小主机内网 IP 是 192.168.31.170 端口是 889 就在这里填 192.168.31.170:889 ,因为前面已经配置了动态解析。所以你在外网输入 你的域名:889 (例如 http://a.naigou.cn:889) 就会指向你的内网 192.168.31.170:889

第三步
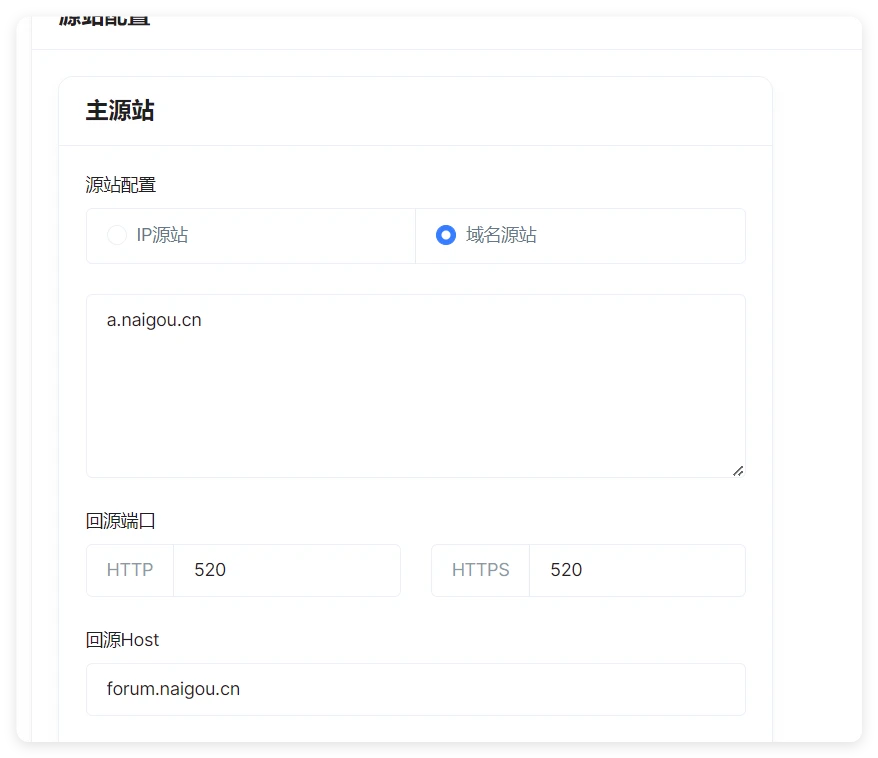
绕开 80 和 443 端口,绕开端口需要用到一个 cdn 服务 利用 cdn 转发端口 推荐使用扩彩云 ,每个月免费 30g 支持境外和大陆加速。
http://kuocaicdn.com/register?code=89be25vcqcq4b
添加自己的域名进去 并设置源站 域名就是你的域名 端口就是你设置的端口

Ad
广告位招租 QQ 31588147
