本文参考 https://www.mancs.cn/856 修改为wp插件免费开源 滑到最下面获取下载链接吧。
演示图
认识Live Photo:超越静态的影像革命
技术本质:Live Photo是苹果开发的动态影像格式(.livephoto),通过HEVC视频(3秒)与JPEG图片的封装组合,实现「按压查看动态效果」的创新交互。用户在WordPress中嵌入这类文件时,传统方案仅显示静态封面。
官方调用方案解析(LivePhotosKit技术栈)
Apple官方提供LivePhotosKit JS库实现跨平台支持,其运作流程如下:
- 文件规范:
- 必须同时提供.jpg静态图与.mov视频文件
- 视频时长限制:1.5-3秒
- 分辨率建议:720p及以上
- 基础调用代码:
WordPress深度整合实战(分步详解)
以下内容来自 https://www.mancs.cn/856
实现原理:
WordPress 中引入 LivePhotosKit JS 库来支持实况图,并创建一个自定义古腾堡区块
首先,我们需要在 WordPress 中引入 LivePhotosKit JS 库
在你的主题的 functions.php 文件中添加以下代码:
function enqueue_livephotoskit_script() {
 wp_enqueue_script('livephotoskit-js', 'https://cdn.apple-livephotoskit.com/lpk/1/livephotoskit.js', array(), null, true);
}
add_action('wp_enqueue_scripts', 'enqueue_livephotoskit_script');
这段代码将在你的 WordPress 站点上加载 LivePhotosKit JS 库
接下来,我们将创建一个自定义 Gutenberg 区块,使用户能够方便地在区块编辑器中添加支持实况图的区域
function register_custom_live_photos_block() {
 wp_register_script(
 'custom-live-photos-block',
 get_template_directory_uri() . '/block.js',
 array('wp-blocks', 'wp-element', 'wp-editor', 'wp-components', 'wp-i18n'),
 filemtime(get_template_directory() . '/block.js')
 );

 register_block_type('custom/live-photos-block', array(
 'editor_script' => 'custom-live-photos-block',
 'render_callback' => 'render_custom_live_photos_block'
 ));
}
add_action('init', 'register_custom_live_photos_block');

function render_custom_live_photos_block($attributes) {
 if (!isset($attributes['photoURL']) || !isset($attributes['videoURL'])) {
 return '';
 }

 $width = '100%';
 $height = '300px'; // Example fixed height, adjust as necessary

 return sprintf(
 '<div class="live-photo-wrapper" style="width:%s; height:%s; position:relative;">
 <div data-live-photo data-photo-src="%s" data-video-src="%s" style="width:100%%; height:100%%;"></div>
 </div>',
 esc_attr($width),
 esc_attr($height),
 esc_url($attributes['photoURL']),
 esc_url($attributes['videoURL'])
 );
}
主题跟目录创建一个 JavaScript 文件 block.js,并添加以下代码
(function (blocks, editor, element, components) {
var el = element.createElement;
var MediaUpload = editor.MediaUpload;
var InspectorControls = editor.InspectorControls;
var TextControl = components.TextControl;
blocks.registerBlockType('custom/live-photos-block', {
title: 'Live Photos Block',
icon: 'camera',
category: 'media',
attributes: {
photoURL: {
type: 'string',
default: ''
},
videoURL: {
type: 'string',
default: ''
},
width: {
type: 'number',
default: 400
},
height: {
type: 'number',
default: 300
}
},
edit: function (props) {
var attributes = props.attributes;
var setAttributes = props.setAttributes;
return el(
'div',
{ className: props.className },
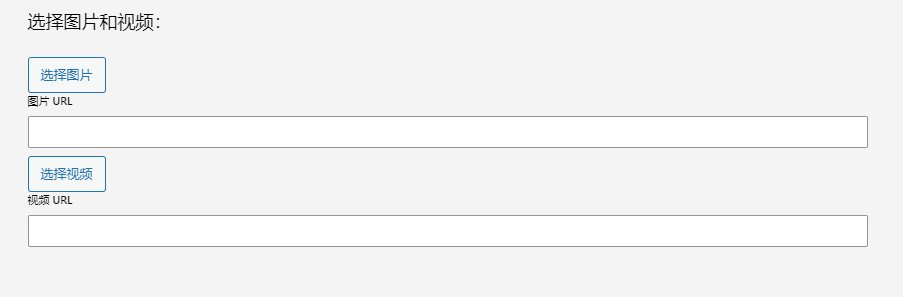
el('p', {}, '选择图片和视频:'),
el(
MediaUpload,
{
onSelect: function (media) {
setAttributes({ photoURL: media.url });
},
allowedTypes: 'image',
render: function (obj) {
return el(components.Button, {
className: attributes.photoURL ? 'image-button' : 'button button-large',
onClick: obj.open
},
!attributes.photoURL ? '选择图片' : el('img', { src: attributes.photoURL })
);
}
}
),
el(
MediaUpload,
{
onSelect: function (media) {
setAttributes({ videoURL: media.url });
},
allowedTypes: 'video',
render: function (obj) {
return el(components.Button, {
className: 'button button-large',
onClick: obj.open
},
'选择视频'
);
}
}
),
el(InspectorControls, {},
el(TextControl, {
label: '宽度(px)',
value: attributes.width,
onChange: function (value) {
setAttributes({ width: parseInt(value, 10) || 0 });
}
}),
el(TextControl, {
label: '高度(px)',
value: attributes.height,
onChange: function (value) {
setAttributes({ height: parseInt(value, 10) || 0 });
}
})
)
);
},
save: function () {
// 后台通过 PHP 渲染,前端保存为空
return null;
}
});
}(
window.wp.blocks,
window.wp.editor,
window.wp.element,
window.wp.components
));
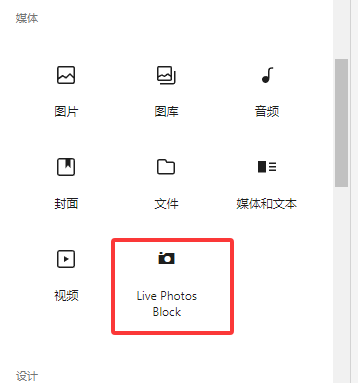
插件版本
本站把它改为插件 使用方法如下 安装启用插件 在编辑器内找到 LIve Photos Block 按图操作。
发表回复